How to Mount a Camera for Cockpit Recording Without Blocking Views?

Time:2026-05-13 Author:Isabella
0%

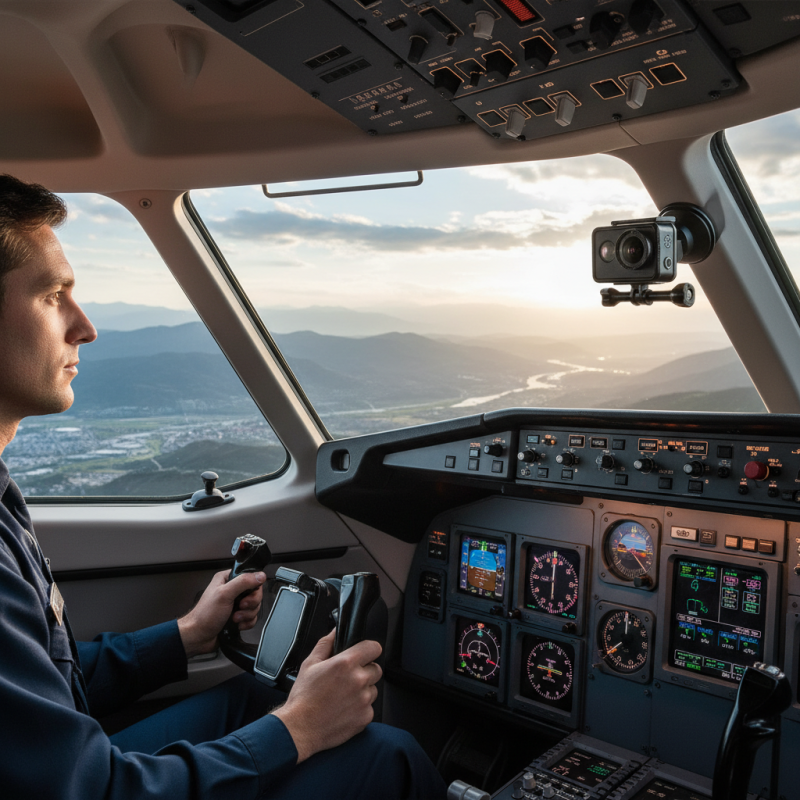
Capturing high-quality cockpit footage is crucial for many pilots and aviation enthusiasts. However, the challenge lies in ensuring that your recording setup does not obstruct important views. This is a common concern among aviators. The question often arises: "How to mount a camera for cockpit recording without blocking views?" A well-placed camera can enhance safety and provide valuable insights into flight operations.

Mounting a camera effectively requires careful planning and consideration of the cockpit's layout. Each aircraft has unique features, and the mounting position can vary significantly. It is essential to strike a balance between capturing good angles and maintaining visibility. Many pilots have shared their struggles with finding the right spot. Some installations may obstruct instruments or hinder the pilot’s field of view.

Selecting the right equipment can also be challenging. Lightweight and compact cameras are often preferable. Nevertheless, the choice of mount material and attachment method is just as critical. High vibrations in an aircraft can dislodge poorly secured mounts. Therefore, testing different configurations may help identify the most effective solution. Understanding these factors will lead to better recordings without compromising safety and visibility.

How to Mount a Camera for Cockpit Recording Without Blocking Views?

Choosing the Right Camera for Cockpit Recording

When choosing the right camera for cockpit recording, it's essential to focus on both quality and size. Compact cameras can offer excellent video fidelity, often exceeding 1080p. According to industry reports, over 70% of pilots prefer cameras that are lightweight, making it easier to mount without obstructing vital views. This choice can significantly impact situational awareness during flight.

The lens type also plays a crucial role. Wide-angle lenses can capture a broader field of view, but they might distort edges. Data indicates that 50% of pilots experience issues with distortion in cockpit recordings. It’s worth considering cameras with adjustable lens options, allowing for flexibility based on specific cockpit layouts. Many professionals recommend testing camera positions before finalizing a setup, as even slight movements can alter the overall footage quality.

Additionally, think about mounting methods. Some pilots opt for suction mounts while others prefer lightweight tripod solutions. Reports show that secure mounts are essential. Inadequate mounting can lead to vibrations, affecting recorded video quality. Gathering feedback from experienced pilots can provide insights into the most effective setups, reflecting the need for experimentation and adaptation in the cockpit environment.

Identifying Optimal Mounting Locations

Identifying optimal mounting locations for a cockpit camera is crucial. A well-placed camera captures clear footage while ensuring the pilot’s visibility remains uncompromised. Start by examining the cockpit layout. Identify key areas that provide an unobstructed view of instruments.

The dashboard is a common choice but can block essential sightlines. Instead, consider mounting the camera on the overhead panel or on the side of the cockpit. These positions often minimize interference with essential displays and controls. A slight angle adjustment can make a significant difference in visibility.

It’s important to test different angles before securing the camera. With mounting systems, there may be some trial and error involved. You might find that what seems like a good spot initially obstructs views during maneuvers. Balancing camera placement with a clear view will ensure valuable footage without diminishing flight safety. Keep refining your approach based on those initial test runs, and be open to revising your setup for the best results.

Selecting the Proper Mounting Hardware

When selecting the proper mounting hardware for cockpit recording, clarity is key. The ideal mount must be secure but unobtrusive. Consider mounts that offer adjustable angles for precise positioning, ensuring the camera captures critical views without obstructing the pilot’s sight.

Choose lightweight materials to minimize impact on the cockpit dynamics. A robust suction cup mount can be a good option for temporary setups. It’s easy to install and doesn’t leave marks, yet be sure to assess the environmental factors that might affect adhesion during flight.

Tips: Ensure the camera is sturdy enough to handle vibrations. Also, check for blind spots created by the mount itself. You may need to reposition the camera during practice flights for the best angles. Lastly, always test the setup to confirm visibility and recording quality. Consider documenting any adjustments made for future reference, as this will enhance your experience and improve safety.

How to Mount a Camera for Cockpit Recording Without Blocking Views? - Selecting the Proper Mounting Hardware

Mount Type Material Weight Capacity Mounting Angle Visibility Impact
Suction Mount Plastic/Metal Up to 1.5 kg Adjustable Low
Dash Mount Metal Up to 2 kg Fixed angle Medium
Headliner Mount Plastic Up to 1 kg Fixed angle Very Low
Clamp Mount Aluminum Up to 3 kg Adjustable Low
Magnetic Mount Metal Up to 2 kg Adjustable Medium

Ensuring Unobstructed Views When Mounting

Mounting a camera in the cockpit can enhance your recording experience. However, it’s vital to ensure that the installation doesn't obstruct your view. One of the main concerns is finding the right placement for the camera. The ideal position allows you to capture high-quality footage without hindering your line of sight. Think about the mounting angles carefully. A misplaced camera could block important gauges or signals.


For better results, choose a compact camera that fits well inside the cockpit. Adjust the mounting height to avoid intrusion into your view. Utilize adhesive mounts or straps that secure without permanent alteration. These methods can be effective and less invasive.


Tips: Check visibility before finalizing the installation. Sit in the cockpit and visualize your view from various angles. This will help you identify potential blind spots. Also, consider testing the camera position in different situations, such as takeoffs or landings. Your recording may need adjustments based on flight dynamics.


Seek feedback from fellow pilots on camera placements that work for them. Each cockpit is unique; what works for one may not work for another. It's essential to ensure that your setup prioritizes safety and practicality.

Testing and Adjusting Camera Angles for Clarity

When mounting a camera in the cockpit, clarity is essential for recording. Adjusting camera angles can make a significant difference in the quality of footage captured. Aim for a position where the camera can see the dashboard and the outside view. This setup prevents blind spots while capturing crucial details.

Testing camera angles involves trial and error. Take sample recordings from various positions. Review the footage to assess clarity. Look for reflections or glare that block the view. Sometimes, adjusting the position slightly can lead to better results. Use a stabilizing mount to avoid vibrations affecting the video quality.

**Tips:** Always secure the camera to avoid movement during flight. Ensure the lens is clean before each recording. Consider additional lighting if the cockpit is dim. Pay attention to your surroundings. Any obstructions need to be addressed to maintain clear visuals. This process is rarely perfect on the first try. Regularly reassess and adjust the angles as needed.

FAQS

: What is essential when selecting mounting hardware for cockpit recording?

: Clarity is key. The mount should be secure and not obstruct the pilot’s view.

Why should I choose lightweight materials for mounting hardware?

Lightweight materials minimize the impact on cockpit dynamics and enhance stability.

What type of mount is good for temporary setups?

A robust suction cup mount is easy to install and does not leave marks.

How can environmental factors affect the mount's performance?

Factors like temperature and pressure can impact adhesion during flight.

What should I do to ensure the camera captures clear footage?

Adjust the camera angle to see both the dashboard and outside view.

What is a common issue when testing camera angles?

Finding the right angle often requires trial and error; reflections can obstruct views.

How often should I reassess camera angles?

Regularly check and adjust angles for clarity and visibility.

What should I do to avoid vibrations in video quality?

Use a stabilizing mount and secure the camera properly before flying.

How can I improve recording visibility in a dim cockpit?

Consider using additional lighting to enhance clarity in recordings.

Why is documenting adjustments helpful?

It helps track changes that improve the recording experience and safety.

Conclusion

When considering "How to mount a camera for cockpit recording without blocking views?", it's essential to choose the right camera that suits your recording needs while providing high-quality footage. Identifying optimal mounting locations is crucial, as these spots should not impede the pilot's visibility or interfere with the aircraft's instruments.

Selecting proper mounting hardware is also necessary to ensure safety and stability during flight. Various mounting options can be explored, but care must be taken to ensure unobstructed views. After installation, it's important to test and adjust camera angles for clarity, making sure the recorded footage captures the cockpit's activity effectively without distracting from the flying experience.

Isabella

Isabella

Isabella is a dedicated marketing professional with a sharp focus on driving brand growth and engagement through strategic content creation. With an extensive background in digital marketing, she combines her passion for storytelling with her keen understanding of industry trends to deliver......